
Part 5a: Reloading Straight Walled Cartridges (.38 Special)
In this section I’ll show you the difference between reloading necked rifle cartridges and straight walled cartridges which are most commonly used in handgun platforms. These types of cartridges can be reloaded quicker because they typically require less steps to complete. I’ll be referencing steps in The Beginner’s Guide to Handloading which contains all the steps necessary to reload necked cartridges because some of the same techniques can be used for straight walled cartridges.
The dies required for straight walled cartridges are a bit different. You receive three instead of two dies. A depriming and resizing die, expanding and flaring die, and a third die to seat and crimp the bullet. More details around each of these dies later in the article.
I have a Taurus model 85 which is chambered in .38 special that I’ll be using these finished rounds in. I’m using brass from many different manufacturers, Sellier & Bellot small pistol primers, Winchester 231 powder and Speer 158gr lead semi-wadcutter bullets. I can reload these rounds for roughly $0.03-0.04 a piece. I would advise against using these as a defense round; but they are perfect for plinking!
Note: The video above outlines steps 2, 3, 7-9; basically the required steps only. The links below will take you to other posts on this website that show the processes with a .223/.556 cartridge. Exact same processes unless noted below.
Step Summary
- First Brass Cleaning (Optional)
- Depriming and Resizing Brass
- Expanding and Flaring
- Last Brass Cleaning (Optional)
- Brass Trimming (If Required)
- Chamfering, Deburring and Primer Pocket Cleaning (If Required)
- Priming Brass
- Bullet Seating Die Adjustment & Creating a Dummy Round
- Making Live Rounds
Step Details
1. First Brass Cleaning (Optional)
This step is optional but I recommended cleaning your brass so your not running a bunch of carbon, dirt, etc. up into your dies. The processes is no different than what I’ve outlined in the post I’ve linked above which I made for reloading .223/.556.
2. Depriming and Resizing Brass
Step 2 is depriming and resizing your brass. This can be achieved with the depriming and resizing die and is almost the same process that I outlined in the post I’ve linked above which I made for reloading .223/.556. The only difference is that you do not need to use case lube when you run the brass through the die.
3. Expanding and Flaring
The next step involves expanding and flaring your brass so it can accept a bullet. This process can be achieved by using the expanding and flaring die. If you omit this step and try to seat a bullet your brass will shave off the copper jacket or lead on your bullet. The RCBS dies that I’m using contain tungsten carbide and do not require case lube for most cartridges. Apparently, this material is somewhat fragile and can’t withstand a drop; furthermore you should never cam over. See the official RCBS reloading die manual for more details on this as I’ve paraphrased it below.
Adjusting an Expander Die (RCBS P/N 18215 Stepped)
a. Lower the press handle raising the ram to the top of the stroke.
b. Thread the expander die down until it almost touches the shell holder (this step is important as you do not want to cam a carbide die)
c. Lock the lock ring.
d. Loosen the expander plug lock ring and unscrew the plug until there are only two or three threads engaged.
e. Raise the handle and insert a sized piece of brass in the shell holder (you sized in step 2 above).
f. Slowly lower the handle until you feel the plug enter the piece of brass.
g. Screw the expander plug by hand until you feel slightly more resistance. This is the stepped portion of the expander contacting the shell mouth.
h. Raise the handle and screw the expander plug another half turn.
i. Cycle the piece of brass through the die then do one of two things depending on if you are using lead or jacketed bullets:
Lead Bullets – Measure the amount of “bell” created by the expander; 0.03″ is desired.
Jacketed Bullets – Insert a bullet into the “belled” piece of brass. The stepped characteristics of the die will allow the bullet to “snap” in place. If it doesn’t, lower the expander plug a half turn, cycle the piece of brass through the die, then try again until it does.
4. Last Brass Cleaning (Optional)
Once you have your brass deprimed, sized and expanded it’s now a good time to clean again to get the carbon buildup out of the primer pocket. I skip this step about one out of three reloads unless there is a really bad build up of gunk. The link above takes you to the post where I’ve outlined the process using .223/.556.
5. Brass Trimming (If Required)
I have a lot of .38 special brass. I’ve gone through about 3 firings of hundreds of pieces of brass and have only found a handful of pieces that needed to be trimmed. This is because when you fire a straight walled cartridge the pressure pushes solely on the bullet as it leaves the barrel. Conversely, on a necked cartridge the pressure pushes on the bullet and neck of the cartridge which is why trimming is typically required after each firing of this type of cartridge. Nevertheless, if you need to trim you can use the link above to help you through the processes. I would highly recommend setting your calipers up for a specific OAL and measure each piece of brass to make sure you have consistency across each piece. This will aid with a better crimp when you seat the bullet.
6. Chamfering, Deburring and Primer Pocket Cleaning (If Required)
If you don’t need to trim your brass you don’t need to do this step. However, if you don’t clean your brass and have a build up of gunk in your primer pocket you may want to clean it out. Above is the link to help you through the processes. Same as my .223/.556 processes only with a different cartridge.
Priming your brass is the next step. Same process as I’ve outlined in my .223/.556 series only with small pistol primers. Follow the link above for the guide.
8. Bullet Seating Die Adjustment & Creating a Dummy Round
This step will take a bit of time to get your seating die adjusted properly for the bullet and crimp. I’ve opted to use a taper crimp on the .38 special.
- Place a piece of prepared brass in the shell holder which is installed on the ram of your press.
- Raise the ram of the press (with the brass) all the way to the top.
- Screw seating die all the way down until you feel a slight resistance. The resistance is caused by the taper crimp shoulder in the die hitting the mouth of the brass.
- Back the die up one full turn away from the case mouth and temporarily lock set the lock ring.
- Lower the ram (with the brass) and insert a bullet into the mouth of the brass.
- Raise the ram of the press (with the brass/bullet) into the seating die to get the bullet seated part of the way into the case mouth.
- Repeat step #6 adjusting the bullet seat plug in small increments until the COAL (cartridge over all length) is your desired length. Or, if using bullets with a cannelure seat the bullet so the top of the cannelure is just above the case mouth.
- Unscrew the bullet seat plug a few turns to prevent it from contacting the bullet as you adjust the seating die for crimping.
- Loosen the die lock ring and raise the ram (with the brass/bullet) into the seating die.
- Screw the die down into the mouth of the case until you feel a slight resistance like in step #3.
- Continue the screw the die down until you feel a firm resistance. Use only finger pressure; no tools!
NOTE: If you seat the bullet down too far here are the instructions on how to use the bullet puller. - Taper crimps should be measured. The taper crimp angle is shallow, so you may not be able to see the amount of crimp being applied. Using the fine blade section of your calipers, measure the round near the base of where the bullet is seated in the case neck. Then measure the case neck right at the case mouth. The case mouth measurement should be .001″-.002″ smaller in diameter. Adjust the die until down 1/8 of a turn until you get this measurement.
- After you are satisfied with the crimp, set the die lock ring and raise the ram (with the brass/bullet) into the seating die. Screw the bullet seat plug down down until it touches the bullet and tighten the lock nut.
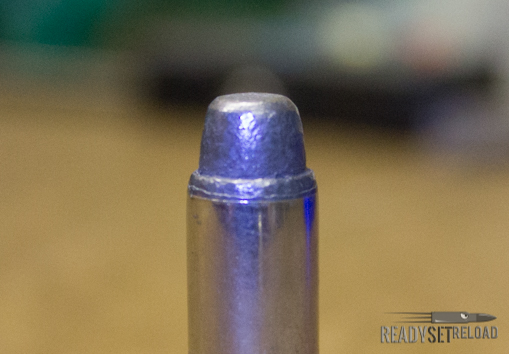
.38 Special Semi Wadcutter with Taper Crimp
The best part of reloading is making the finished product. Once your seating and crimping die is adjusted you can start mass producing rounds. You will need to know how to measure your powder in this step. It’s the exact same process as outlined in my previous video which you can see here. You can see the whole process with .38 special in the video at the top of this page. I can tell you that my choice of lead semi wadcutter bullets made my revolver very dirty. I probably won’t pick these bullets again although it makes for a very cheap cartridge for target practice.
As you can see, reloading straight walled cartridges is much easier than necked cartridges. I hope you’ve found this post educational. Feel free to leave feedback.
