
Case Trimmer and Brass Trimming
In this post I’ll be talking about my case trimmer and brass trimming. Specifically the Forester case trimmer that I use. This task, along with many others, required a lot of time research what would fit my needs the best.
When I started researching case trimmers I found there were three types; manual, manual with the ability to hook up a power drill to transform it into a quasi automatic trimmer and fully automatic. What I really wanted was a manual trimmer that had the ability to use a power drill but based on YouTube and Amazon reviews I ended up with the Forester Products
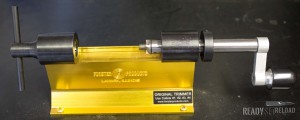
Forester Products Brass Trimmer
Original Case Trimmer. Cost and quality are the drivers for this purchase. When you watch this video you will see that the design is solid compared to some of the other ones on the market. In the end you want something to fit your needs and most of all make the unpleasant task of brass trimming better.
The model I purchased came with collets and pilots for the most common calibers. You can purchase extra ones for other calibers if you choose. Like many of the manuals that come with reloading tools they suck. I actually had to watch a video on YouTube to help me adjust this thing and use it properly.

Forester Products Brass Trimmer Collet
The collet side of the trimmer is straightforward. Find the collet that matches the caliber your using (#1 for 223/556) and load it in the trimmer. Next, find the pilot for your caliber (#22 for 223/556) and insert it into the trimmer using the set screw that is located near the pilot hole. Finally, to set the length of your trim you adjust the black ring by the handle of the trimmer. There are two set screws on that black ring; one for major adjustment and one for minor adjustment. You will need to look closely to see which is which (this is why I had to consult YouTube). The minor adjustment has a 2nd set screw that adjusts horizontally against the frame of the trimmer. Again, the video below will show this better than words alone.
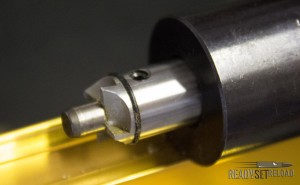
Forester Products Brass Trimmer Pilot
Knowing how to adjust your trimmer does no good unless you know what length to trim your brass. Remember the Lyman Reloading Handbook that I talked about in my first couple posts? Time to open it up and find the page with the cartridge you are reloading. In my case, page 137 for 223/556. On this page you will find a diagram that shows the “maximum allowable loaded cartridge dimensions according to accepted industry standards” as written by the editor; Thomas J. Griffin. Consequently, the data table that is on the same page shows a “Trim-to Length”. Which should you use? Well, since the diagram shows 1.760″ as the maximum length and the “Trim-to length” is 1.750″ anything in between will work. Personally, I like to keep each case 1.755″ for 223/556. I’m reloading for accuracy so I trim the brass each time I reload to keep the volume of the case consistent as possible. This paired with sorting your brash by manufacturer and year like I explained a few posts back will help improve accuracy.
Now that you know how to adjust your trimmer and how long your brass should be here are the basic steps for brass trimming:
NOTE: This is a great time to inspect your brass for cracks or failure a second time.
- Make sure the minor set screw is extended and tightened in place to leave a small gap when the trimmer is fully engaged against the brass.
- Load your brass into the trimmer and tighten the collet.
- Without trimming the brass, engage the trimmer against the brass, slide the black ring against the frame then tighten the major set screw.
- Spin the trimmer handle which should cut a small amount of material from the brass. Note there should still be a small gap between the black ring and the frame; only the set screw should be creating friction.
- Remove the brass from the trimmer and measure it with your caliper as I described in the last post.
- Adjust the minor set screw accordingly based on the desired length.
- Repeat steps 4-6 until you are satisfied with the length.
Now that your trimmer is adjusted the brass trimming process will speed up. I set my calipers at the desired length (1.755″ in my case) then lock them. I throw one of every 5-7 trimmed pieces into the locked jaws of my caliper to make sure adjustments haven’t worked their way loose in the trimmer. I’ve never had this happen but I like to do it anyway.
If you remember, I talked about my career in the IT field in my first post. Well, being that I’m in the IT field I don’t have seasoned hands as most others who might be reading this. I can tell you that after about 100 pieces of brass you might develop a blister on the inside of your hand depending on the way that you spin the trimmer. Not a big deal but I figured I would share. I’m sure I’ll get a lot of comments from people about that!
The next step is cleaning your primer pocket, chamfering and duburring.
Equipment discussed in this section:
