
Improve Accuracy by using an OAL Gauge
*****WARNING******
At 21:10 I misspoke in this video. 0.05″ from the lands would make your measurement 1.920″ not 19.720″ like I said in the video! (1.970 – 0.05 = 1.920). Unfortunately YouTube removed the ability to add annotations to videos created after March 2017.
*****WARNING******
In this section I’ll be explaining how to use an OAL gauge to improve the accuracy of your handloads. An OAL gauge enables you to get measurements inside the chamber of your rifle. This will allow you to accurately experiment how much jump (distance between the ogive and lands in your barrel) your handloads can be accurately fired from your particular rifle.
Step Summary
- Measure Over All Length (OAL) using Modified Case
- Measure Headspace of the Modified Case
- Measure Headspace of the Ready Set Reload Case
- Calculate Over All Length (OAL) of the Ready Set Reload Case
Step Detail
Measure Over All Length (OAL) using Modified Case
First you will need an OAL gauge along with a modified case and bullet comparator inserts for the specific caliber
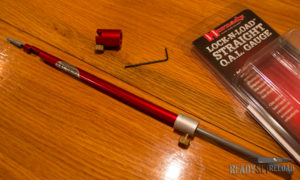
Hornady OAL (Over All Length) Gauge
that you are reloading. These three items are purchased separately from each other. I’ll provide links at the bottom of this page for the caliber that I’m using which is .223. Today I’m reloading for my AR15 so I’ve taken the upper off and placed it on my bench. The next thing you will need is a projectile that your planning on using in your handloads. Today I’m using a Sierra MatchKing Hollow Point Boat Tail (SMK HPBT). Finally, you will need a cleaning rod.
- Thread the Hornady Modified Case on the end of the OAL Gauge
- Adjust the grey plastic slider so its just inside the mouth of the modified case
- Insert the projectile into the mouth of the modified case
- Insert the OAL gauge (and the projectile) into the chamber of your rifle
- Push the red aluminum frame of the OAL gauge until the case hits the chamber if your rifle
- Push the grey slider into the chamber of your rifle until the projectile hits the lands of your barrel
- Tighten the brass finger screw against the grey slider locking it in place
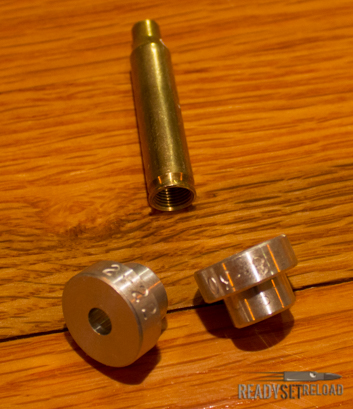
Hornady Modified Case and Bullet Comparator Inserts
- Remove the OAL Gauge from your rifle
- If the projectile gets stuck on the lands of your rifle you can remove it by using the cleaning rod
- Attach the bullet comparator insert to the caliper arm adapter using the brass finger screw making sure that it sits square against the caliper arm
- Close the calipers until the right hand arm is against the bullet comparator insert
- Zero the calipers
- Insert the modified case in the calipers. The projectile should fit inside the bullet comparator and the right hand caliper arm should be directly against the bottom of the modified case
- Record this measurement as “OAL of Modified Case”; you will need it for later
Measure the Headspace of the Hornady Modified Case
For this step you will need to purchase a Hornady headspace comparator for the specific caliber you are reloading. I’ve purchased the kit which can be shown in the illustration below.
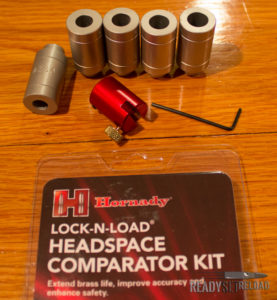
Hornady Headspace Comparator Kit
- Attach the headspace comparator insert to the caliper arm adapter using the brass finger screw making sure that is sites square against he caliper arm.
- Close the calipers until the right hand arm is against the headspace comparator insert
- Zero the calipers
- Insert the modified case in the calipers. The right hand caliper arm should be directly against the bottom of the modified case
- Record this measurement as “Headspace of Modified Case”; you will need it for later
Measure the Headspace of the Ready Set Reload (RSR) Case
In this step the “Ready Set Reload Case” is defined as the case that you’ve already prepared. In a previous video I talked about how I sort my brass by brand and how many times its been fired. I reload in batches of 100 so by sorting you can get a consistent collection of brass. You will need one of your pieces of brass for the steps below.
- Attach the headspace comparator insert to the caliper arm adapter using the brass finger screw making sure that is sites square against he caliper arm (this is likely already done if your are following this page in order)
- Close the calipers until the right hand arm is against the headspace comparator insert
- Zero the calipers
- Insert the “Ready Set Reload” case in the calipers. The right hand caliper arm should be directly against the bottom of the case
- Record this measurement as “Headspace of RSR Case”; you will need it for later
Calculate the OAL
In this step you will use the three measurements that you’ve acquired above to calculate the OAL that you can use. These numbers will need to be calculated each time you either change rifles or brass. My artistic ability is extraordinary so I decided to draw a picture showing the relevant dimensions.
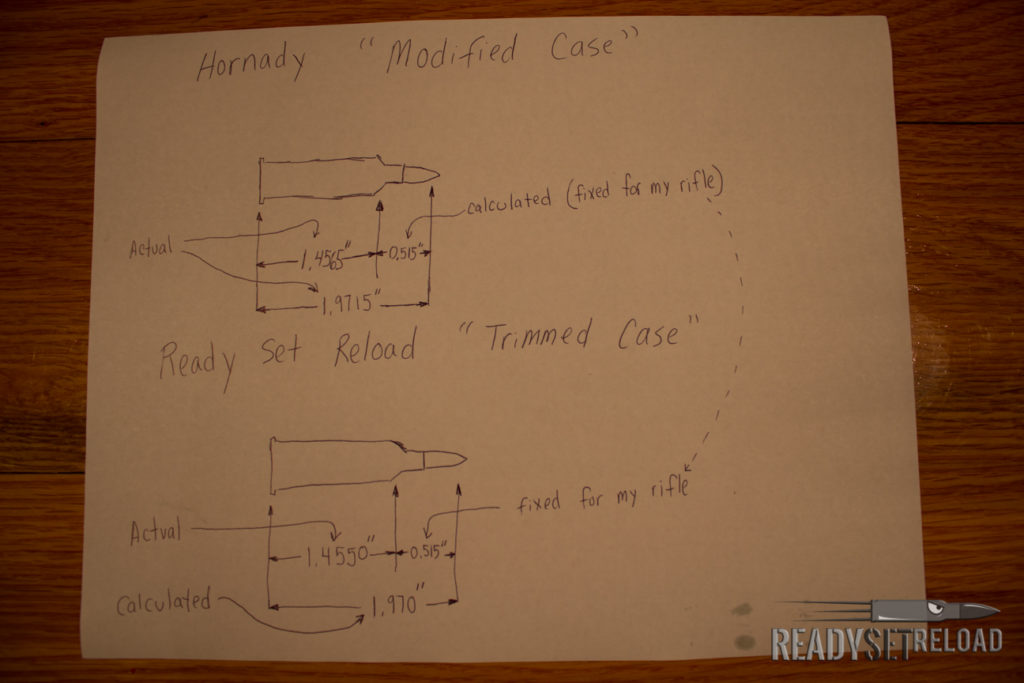
Headspace & OAL Gauge Measurements
In the picture above the following will be referenced as I describe the process:
- “Actual” = Actual measurements that you’ve taken in the beginning of this post.
- “Calculated” = Dimensions that you’ve calculated based of “Actual” measurements
- “Fixed for my rifle” = Dimension that will be unique for your rifle (and every other rifle ever manufactured). I’ll refer to this as “Fixed” below
- “Hornady Modified Case” = The modified case that is purchased separately from the OAL gauge. This screws on the end of the OAL gauge as described earlier.
- “Ready Set Reload Trimmed Case” = A case that you’ve prepared and are planning to reload
- “Ogive” = Data point reference near the end of the projectile
- “Datum” = Data point reference on the next of the case
- “OAL” = Measurement from the base of the case to the ogive
Now it’s time for some math so get out your calculator.
- Subtract the following: “OAL of Modified Case” – “Headspace of Modified Case” = Distance between the datum and ogive for your rife. This is “Fixed” and will never change for your particular rifle.
- Add the following: “Headspace of RSR Case” + “Fixed” = “OAL of RSR Case” This is the final measurement that you need to set your reloading die for maximum accuracy.
Conclusion: Using the Measurement
Now that you have the “OAL of RSR Case” you can it to setup your reloading die. I would recommend backing the bullet seating depth of your die off 0.05″ from the “OAL of RSR Case” measurement. This will give you 0.05″ of bullet jump before it engages the lands of your rifle. Next, go shoot some rounds while measuring them with a chronograph and checking for unsafe pressure. Depending how your rifle reacts to the 0.05″ bullet jump you can reduce or extend to improve your accuracy.
I hope you’ve found this article useful. Below are links to the products that I’ve referenced in this article.
